Description
14-15 day trek through the iconic Annapurna Conservation Area on the Annapurna Circuit. Guide is intended for solo (i.e. trekkers with no porters or guides). Climb 16,300ft in over 127 miles. Trek begins in rural rice farms and gradually climbs to desolate high altitude mountain ranges of the Himalayas. Enjoy picturesque waterfalls, jaw dropping peak views, beautiful alpine lakes, hot springs, and rural villages. Stay in quaint guesthouses and hotels that include restaurants so less needs to be packed. Enjoy the company of locals and other trekkers who share the same vision of the outdoors and environmental preservation. Guide includes .GPX files for every day and entire trek.
Snapshot
- Days: 14-15 days
- Distance: 127 Miles
- Elevation Gain (Descent): 16,300ft (-11,279)
- Peak Seasons: Oct/Nov, March/April
- Expenses: $400-500usd (w/o guide or porter)
- Starting/Ending Point: Besisahar/Jomson
Clothing and Gear
Listed below is a list of gear, clothing, and backpack I wish I brought. We are on a 1 year travel journey and had to improvise. Also, we thought we needed more for the amount of days and weather but were surprised at how little we actually used. Depending on the season you choose to go, you may or may not need all the gear listed (or you may need more if colder). The list below is intended for peak season (i.e. Oct/Nov).
We also had to find gear/clothing in Kathmandu and Pokhara. You have a wide variety of knockoff gear and limited options of real quality manufacturers. Sherpa Adventure Gear is located in both Kathmandu and Pokhara as well as North Face, Columbia Sportswear, and Outdoor Research but they will be quiet expensive. The store offers more than just Sherpa clothing, they also stock backpacks, boots, and misc. camping equipment (that you won’t need on the trek). If you have to choose knockoff gear, check Shonas in Kathmandu. It’s a dirty little store but easily the best quality you’ll find. You can also rent from them but the price breakdown isn’t that much less than buying. We had to get knockoff North Face sleeping bags (not from Shonas) and were surprised in how well they kept us warm and stayed together. Also, bring your own boots! Don’t trust the knockoffs.
Gear
- 40-50L Backpacking Pack, such as Osprey Aethera AG 60
- Compressable Daypack
- Trekking Poles
NOTE: we used knockoff trekking poles bought in Kathmandu. They were in the higher end of the knockoff selection. We were surprised as they worked fine with little maintenance needed. The low end trekking poles look like they will break in a day (they look like Leki knockoffs). - Boots. Bring your own boots! I’m a Vasque fan and these are the boots I used Vasque Monolith Ultradry
- Water Filter Sawyer Mini, Steripen, or purifying tabs
NOTE: I bought water purifying tabs in Kathmandu at a local pharmacy. I got sick from the water even when using the tabs. Either buy quality tabs from Shonas or bring from your country. - Sunglasses with Chums
- Diamox. High elevation medication. You can get this in Kathmandu and Pokhara for very cheap.
- SIM Card: don’t get Ncell, it doesn’t work in the circuit. Telecom (state owned) and Smart Cell are the other cell companies in Nepal.
- Toiletries
NOTE: You will have to pack your own toilet paper. You can buy them easily in the villages but the price goes up the higher you go. - Sleeping Bag: 15-32 degree bag that is lightweight and compact. I like the Marmot Trestles for it’s degree rating and light weight. You can go even lighter with just a cocoon liner and the tea house blankets, however depending on the time of the year, you may get cold.
Note: We met several people who didn’t use sleeping bags. The guesthouses/tea houses and hotels all give you blankets and you can ask for extras. - First Aid Kit
- Travel Adapter
- IMS and ACAP permits: TIMS website, ACAP website
- (optional but recommended) quality camera (such as the Sony Alpha Series which takes amazing photos in the backcountry) or GoPro
- (optional but recommended) power bank
Note: majority of guesthouses and hotels offer charging but they start charging you money the higher you go up. - (optional) Journal
- (optional) instant coffee and/or tea. Easy to buy hot water and make your own instead of buying a cup of shitty coffee.
- (optional) Good book / Tablet
- (optional) Card Deck
- (optional) prayer flags for Thorong La
Clothing
Note: don’t bring cotton. Your cotton cloths will get soaked with sweat everyday and will take forever to dry. Look for breathable wicking layers instead.
- Hiking pants with zip off legs. I always used to make fun of zipoff pants but they are surprisingly helpful. Your days start off cold and you quickly heat up.
- 1-2 pairs of hiking shorts. I’m a fan of Patagonia Nine Trails shorts because of the lining and zip pockets.
- 2 wicking short sleeve shirts
- 1 wicking long sleeve shirt
- Thermal long underwear
- 2 pairs of hiking socks
- 3-5 pairs of underwear (depending on how often you do laundry… or how smelly you want to be)
- Buff
- Hat with a bill
- Beanie
- Think insulated gloves
- Quality puffy jacket. I had the Patagonia Micropuff but it was not enough. I wish I had my Mountain Hardwear Mt. Eyak Jacket as it has kept me warm in the coldest of climates. I had to buy a knockoff puffy along the way and was surprised at how well it kept me warm.
- Mid layer top. I’m a fan of Patagonia’s Capilene with it’s breathability and abilty to keep you warm
- Raincoat
NOTE: Helps with insulation but it did not rain on our trek in Oct/Nov. - (optional) Fleece. I run cold thus I opted to bring an additional layer. I like Patagonia’s R1 Pullover the same reasons as the Capilene
- (optional) Rain pants
- (optional) camp shoes or sandals.
GPS Track
Download GPX Track
Day to Day Guide

Day 1: Besisahar to Ngadi (bus) – Ngadi to Bahundanda (trek)
- Distance: 7.5 Miles (bus) – 2.8 Miles Trek
- Elevation Change: 490ft (bus) – 1,109ft (trek)
Depending on where you are arriving from (Kathmandu or Pokhara), your day will start with arriving in Besisahar by bus. You will need your TIMS and ACAP permits for the first checkpoint. You can also aquire them both here but there is a line of people getting their TIMS stamped and signing in so expect to wait if you do. Besisahar is also a place to withdraw the money you need. 35,000-40,000npr per person is a safe number to withdraw. More if you plan on buying beer and fancy food (i.e. pizza, yak burgers, etc.).
You’ll find the local bus at the end of the street where you get dropped off at. Ask around and locals will direct you to where the bus will pick you up. Don’t expect much from the bus ride. It’s going to be bumpy, cramped, and confusing. Just trust that the bus will end in Ngadi (the furthest it can go). You can also hire private and shared jeeps in Besisahar that can take you as high as Manang. I highly recommend against this as you need the time to acclimate and you’re missing a ton of beauty along the trail.
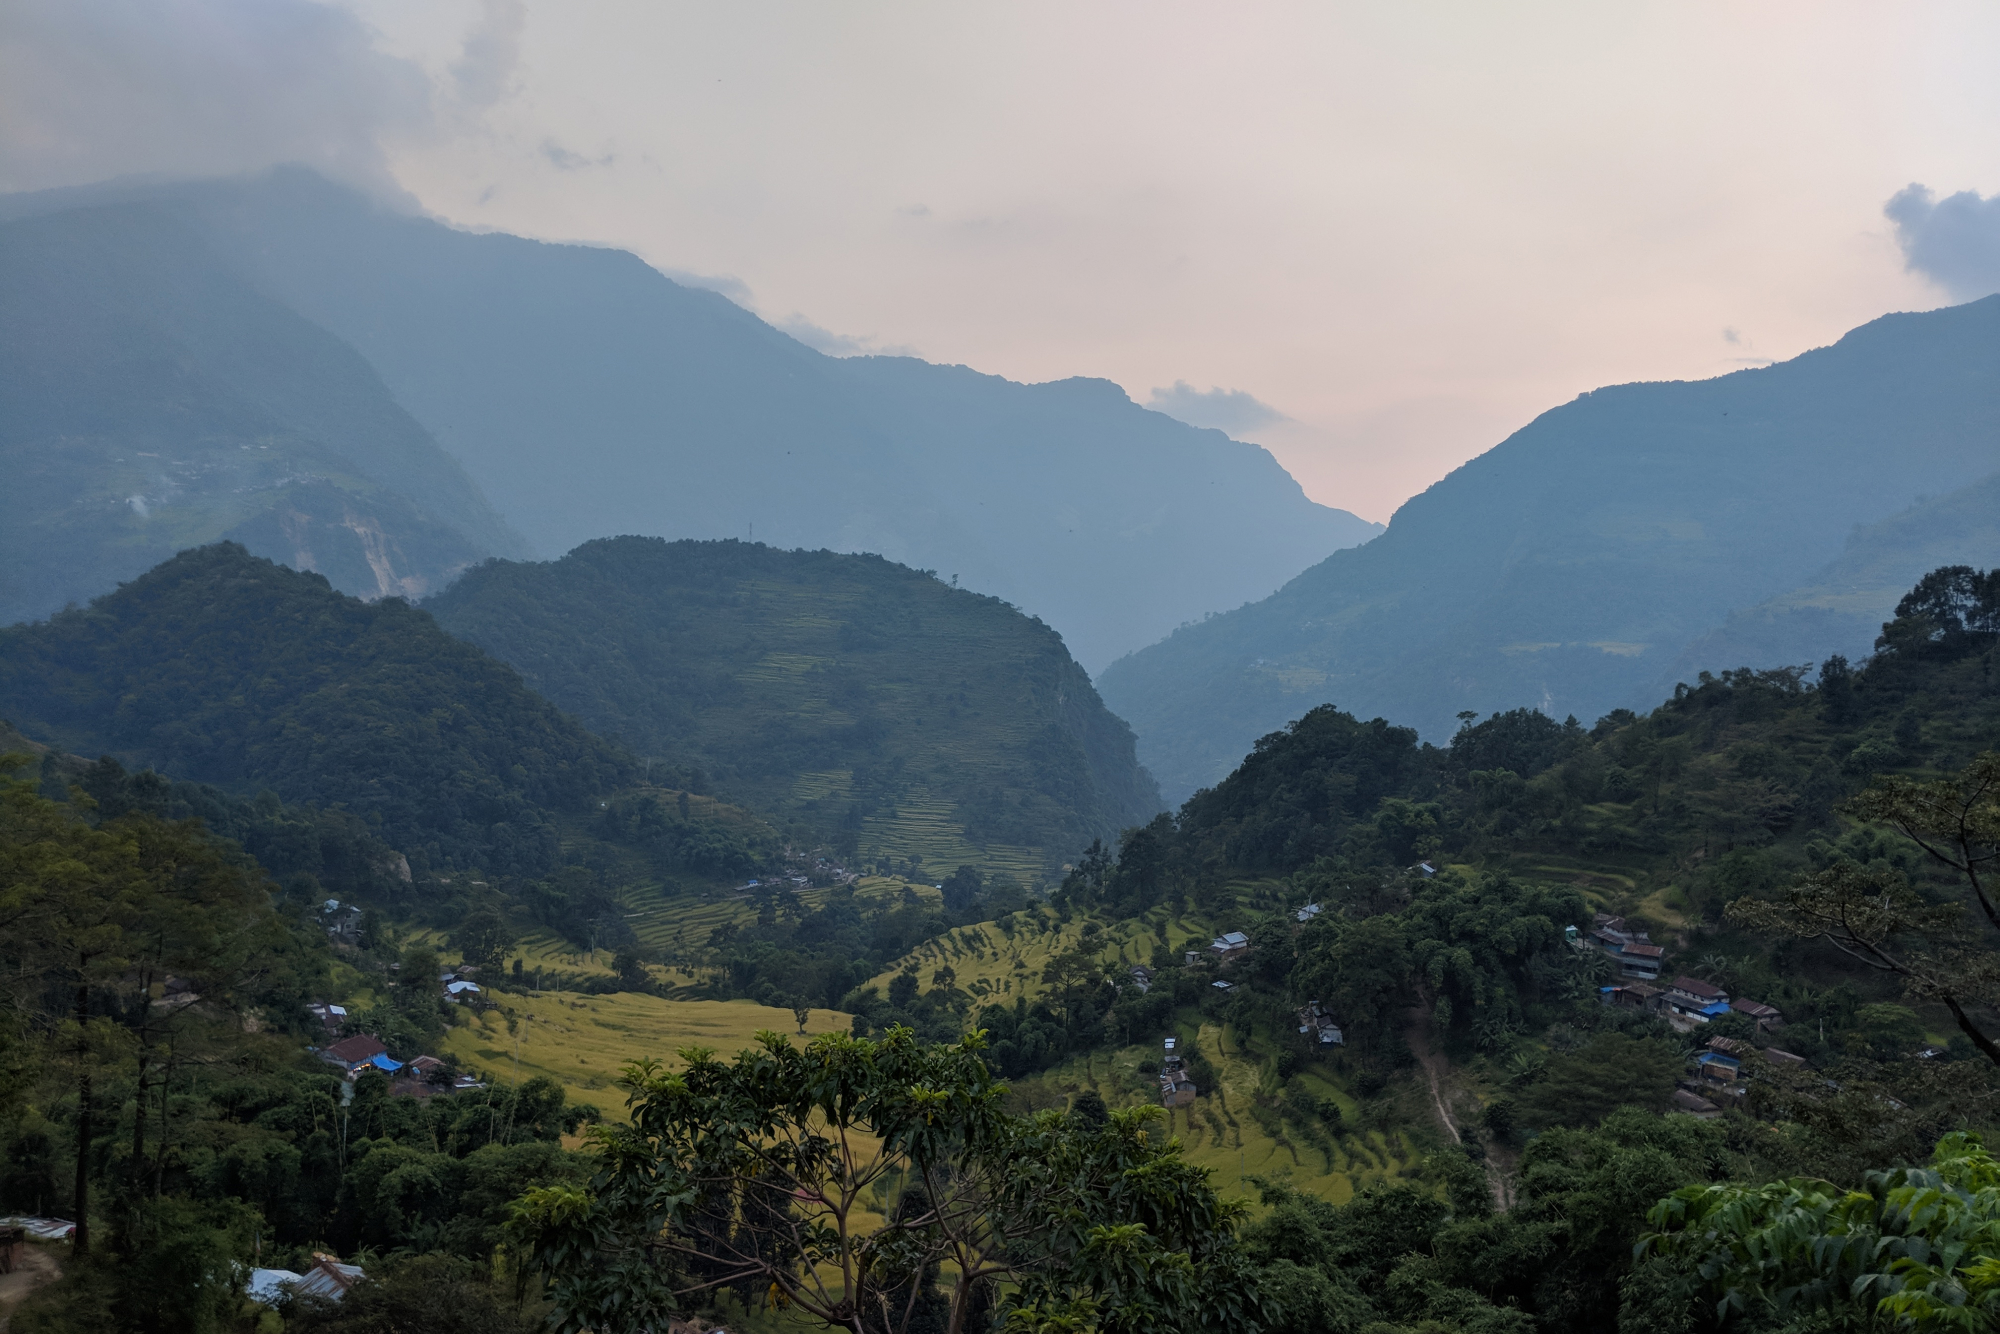
The trek hikes through beautiful rice farming villages. Be aware that there are people along the path trying to get you to stay in their guesthouses. No need to jump on any of these right away as there are options available in Bahundanda. We stayed at a guesthouse called Swiss Alps Guesthouse and discovered we were the only people staying there. It was very limited but was clean. Majority of trekkers tended to stay at Super View.
Day 2: Bahundanda to Jagat
- Distance: 6.3 Miles
- Elevation Change: 162ft
This leg continues hiking through beautiful rice farming villages that look like they are straight out of the Hobbit’s Shire. You cross your first of many suspension bridges. Hike is relatively easy and you end your day in early afternoon in Jagat.
Jagat is a cute village that is still being developed. We stayed at Mont Blanc and the owner informed us of many new hotels coming up around him. He also directed us to two different hot springs. He recommended we walk an extra 15 minutes outside of town for cleaner hot springs. The hot springs outside of town are poorly marked on the main road and involves a steep descent but are worth it. Serene pools next to rushing rapids tucked away in the gorge. You will probably meet locals here who bathe and do their laundry in next to the hot springs.
Day 3: Jagat to Dharapani
- Distance: 9.5 Miles
- Elevation Change: 1,710ft
Longer and harder day. Today’s trek has several climbs and descents following cliff edges that are exposed. Unfortunately, we met a group of French hikers the night before who had a friend fall off one of these cliff edges and died (click here for article). These cliff edges are to be walked mountain side and with caution. Alternatively, you can hike along the road where the jeeps drive.
The geography starts to change to a narrow gorge and high cliff walls around you. You’ll see waterfalls, insane rapids, and mountain goats. You pass through a tranquil town called Tal after a steep push. This is a great alternative to stop if you feel Dharapani is too far.
Dharapani is larger with more accommodations and amenities. Majority of people shoot for staying at New Tibet thus it fills up fast. Call ahead (see directory) if you choose to stay here. We stayed at The 7 due to the other guesthouses being full and too tired to backtrack or push forward (even for 5 extra minutes). The 7 tried to swindle us to pay double (and I noticed they did this with other trekkers) which led to us learning to negotiate prices before accepting. We learned to do this at every guesthouse and hotel after and majority will let you stay for free if you negotiate to eat lunch, dinner, and breakfast the next day in their guesthouse or lodge.
There is also a checkpoint here but you will do this on day 4. Prepare ahead as the checkpoints can take time if you are going without a guide or porter.
Day 4: Dharapani to Chame
- Distance: 10 Miles
- Elevation Change: 2,802ft
You will also begin this day going through the ACAP checkpoint which may take some time. If you are going without a guide or porter, expect to be treated like second class citizens at these checkpoints; you will be cut in front of and the people working these checkpoints will take the guides over you which involves them checking each tourist they are guiding.
Today is another long day with a steep ascent. You can opt to take the road which will cut off switchbacks however you will miss hiking through an old growth forest where Tibetans set up booths selling necklaces, rings, and other touristy items. Today was also the only day we ever got a little lost. We, somehow, went off trail and ended up in this cool exposed soccer field behind Timang with incredible views of peaks all around us. Timang is also a great lunch spot to stop.
Chame is a beautiful, quaint town with shops that sell trekking clothing, mini marts, and a pharmacy. There are also hot springs here on the other side of the river. We liked Chame enough to stay a second night. We also liked our guesthouse called Hotel Tilichio Guesthouse that had private cottages facing Manaslu peak and the best Dal Bhat on the circuit.
Day 5: Chame to Upper Pisang
- Distance: 9 Miles
- Elevation Change: 2,060ft
Today’s trek begins with a short hike to Bhratang where an apple orchard, factory, and (most importantly) a coffee and fresh bakery house reside. Fresh apple pasteries and espresso, best place to discover on this trek. However, everyone tends to stop here so be prepared for a line. There is also a very nice looking lodge here that looks new from the outside.
After Bhratang, you climb steadily to a high altitude forest with dispersed think pine trees similar to ponderosa pine trees with incredible views of mountain peaks. Guidebooks state Upper Pisang has less accommodation however when we arrived, there were several new hotels and guesthouses that are well made.
In Upper Pisang, we stayed in Hill Top Super View Hotel (spelled like that) which included hot geyser shower and incredible peak views outside your bedroom window. You can also hike down to Lower Pisang easily and visit a Buddhist gompa where a caretaker monk lives.
Day 6: Upper Pisang to Manang (high route)
- Distance: 12 Miles
- Elevation Change: 768ft
Significant elevation change between Upper Pisang and Gyaru but you drop down from Gyaru to Manang thus only 768ft change.
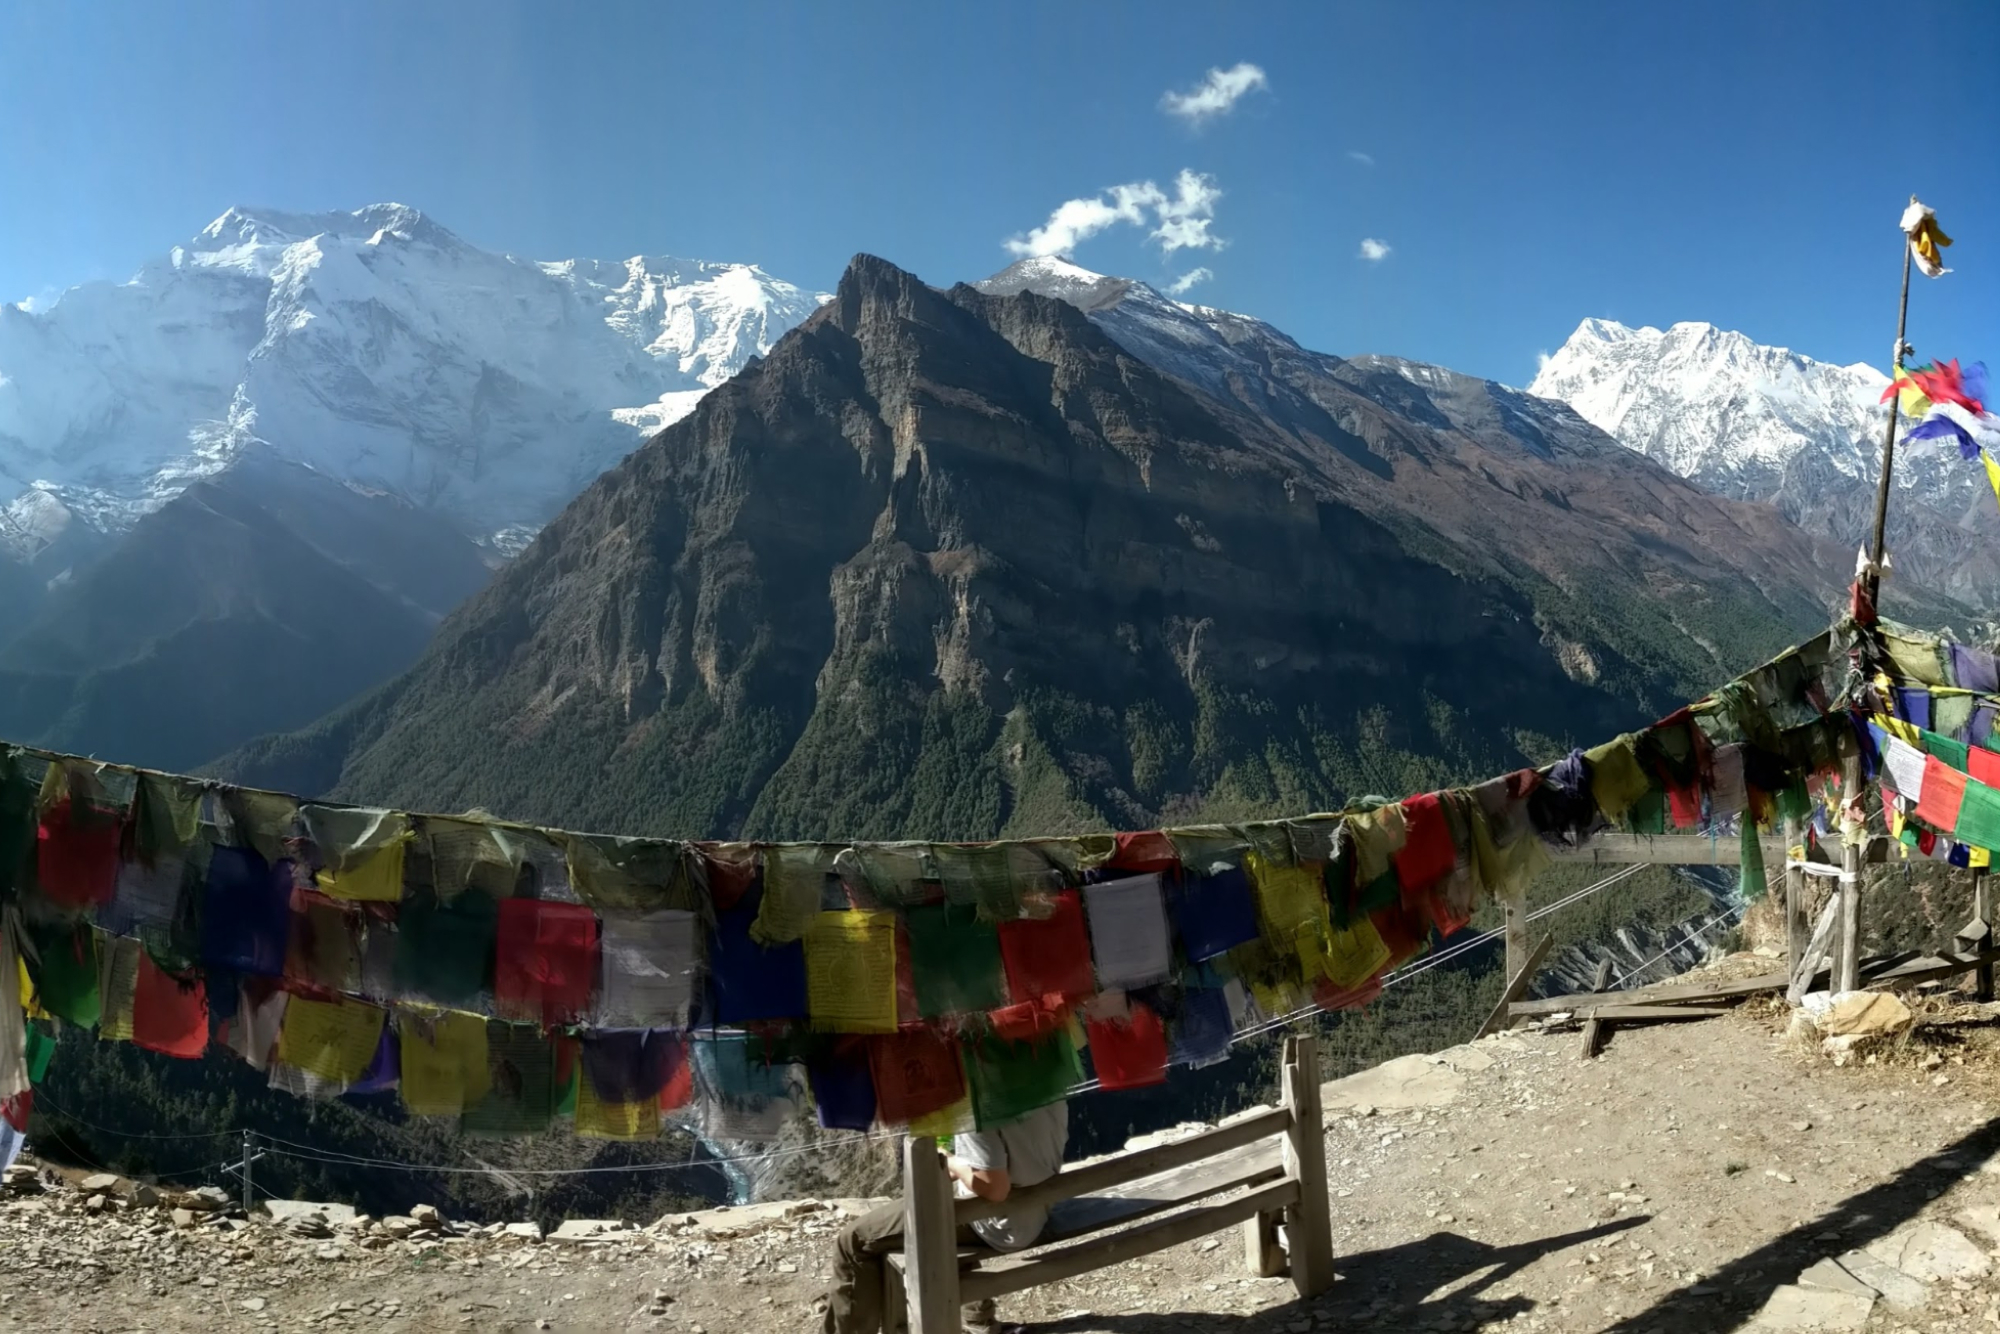
Today is a long day so start early. You also want to beat the crowds as Manang can fill up or call ahead to reserve your stay. Don’t let the elevation change listed above fool you, you will be hiking up to Gyaru which is a long switch back path that will tire anyone (except the superhuman porters). Although a tough hike to Gyaru, the views are incredible and even worth the extra night to stay here. You end the grueling switchbacks up steps to a stupa overlooking the Annapurna Range. There are locals who sell handmade apple pies and potatoes pakodas that make the entire effort worthwhile. The village of Gyaru is also incredible with old stone buildings and cafes.
Past Gyaru, you begin to descend back down towards the road gradually. The scenery is spectacular and the crowds tend to thin as they stop in Gyaru or Ngawal. Once the trail meets up with the road, you’ll wish you could hitch a ride with a jeep as the views of Manang are off in the distance on a straight path. You’ll pass through Bhraka, which is near Manang and a great alternative to Manang, that has side trails to Ice Lake and Milrepa’s Cave.
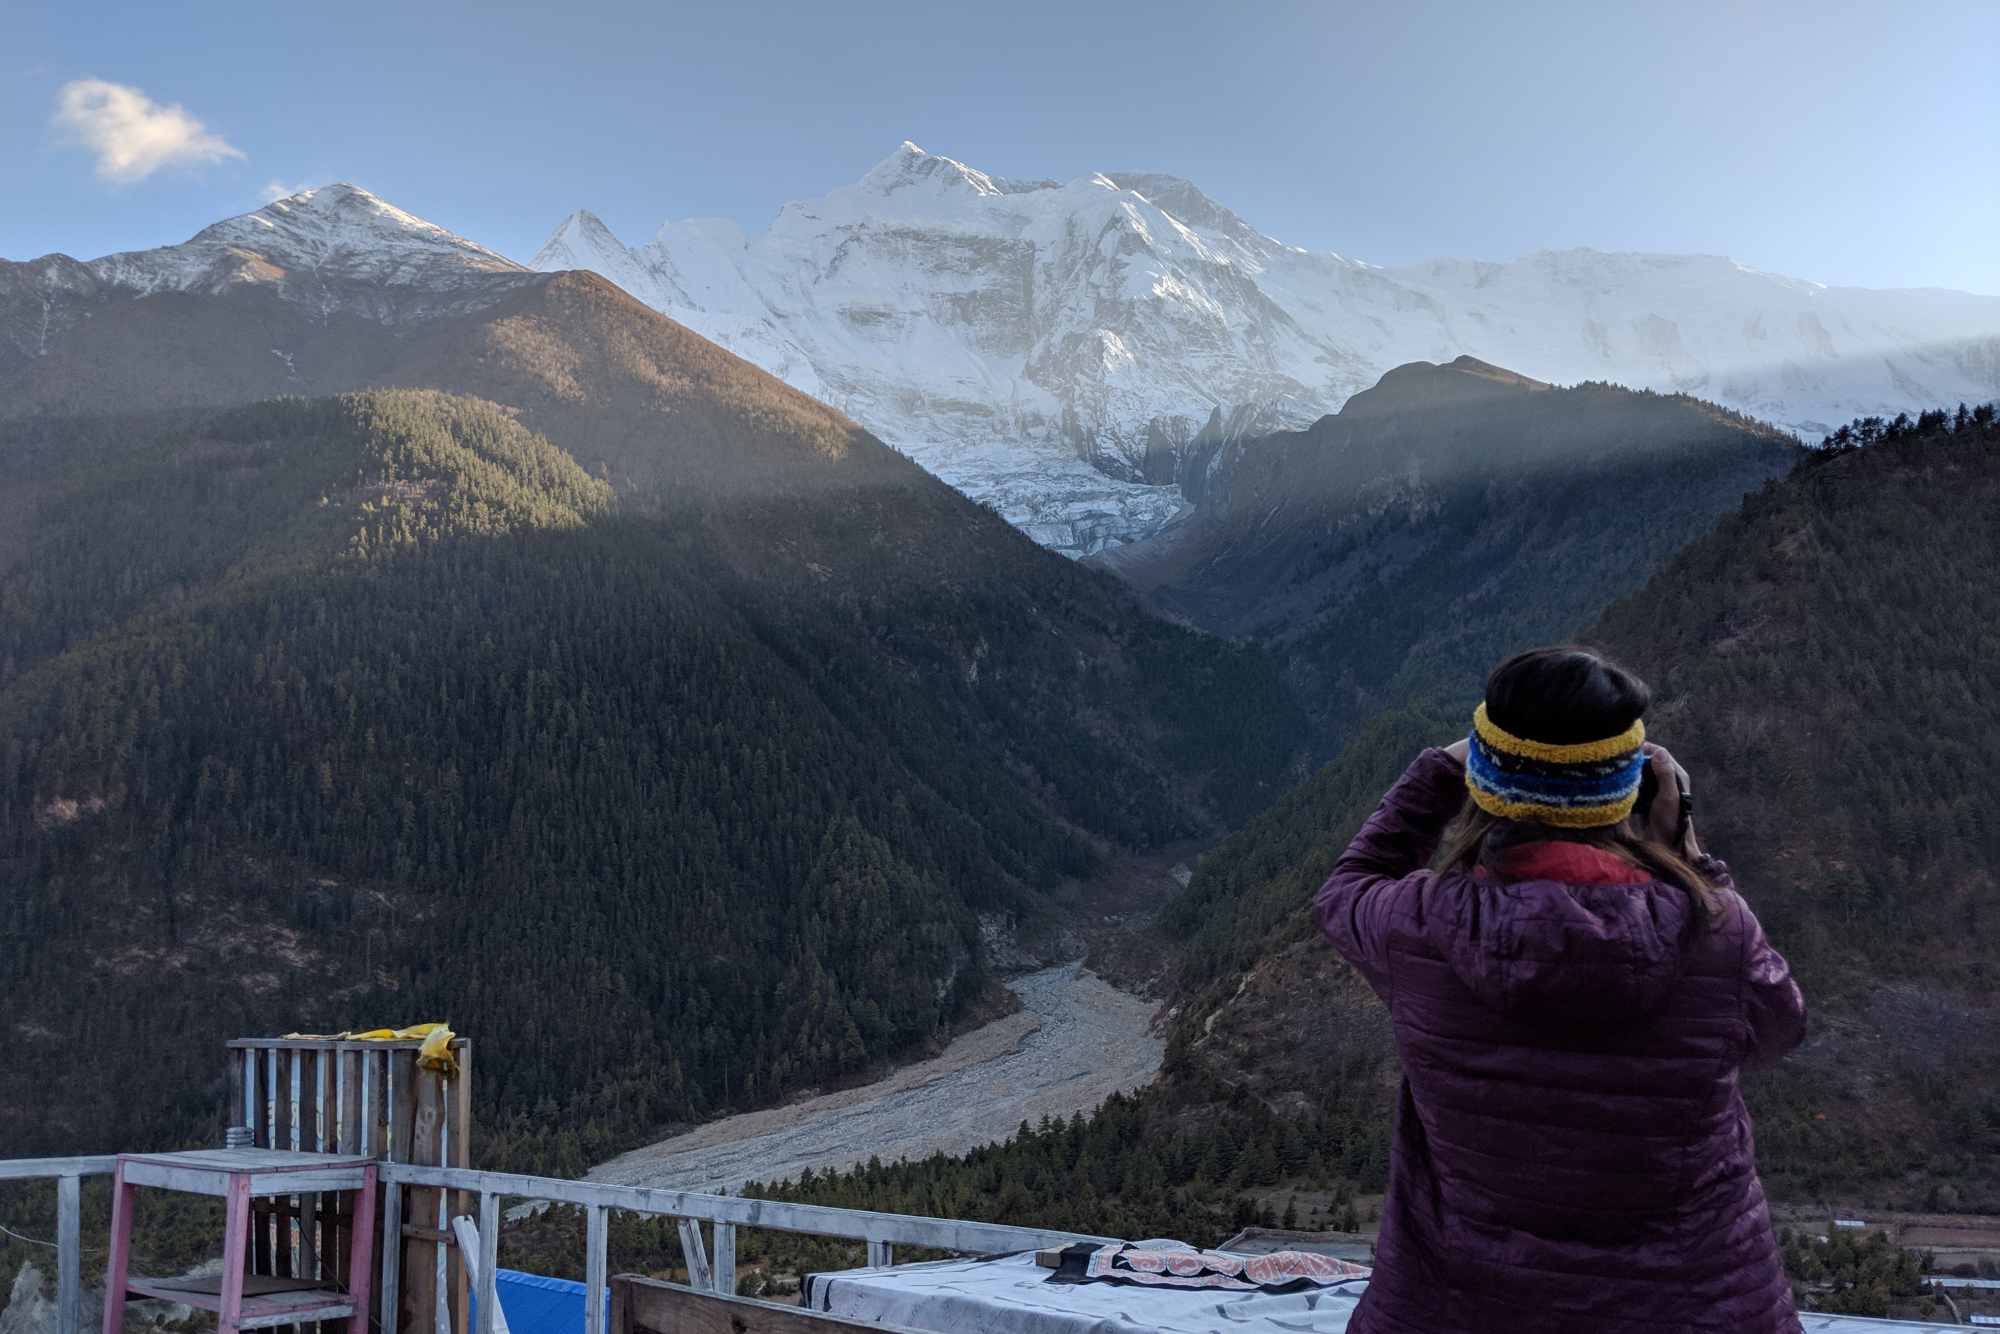
Once in Manang, the town is well developed with a bank, several guesthouses/hotels, a bakery and espresso café, hospital staffed by the Himalayan Rescue Association, pharmacy, and outfitters. You will either be spending a layover day here, continue on to Tilicho Tal Lake the next day, or both. Manang has several side hikes that are all worth doing.
We stayed in Himalayan Singi Guesthouse and found it accommodating with several different types of rooms. We were also forced to stay here as all the other rooms were booked. We attempted to stay the guesthouse with the attached bakery and café but they were going to charge us triple what we would pay anywhere else just because it was the last room they had available. I would also highly recommend attending the Himalayan Mountain Rescue Association on Acute Mountain Sickness and other high altitude ailments that may happen. The non-profit organization is run my MDs from around the world and are there to help trekkers and local villagers. The talk was very helpful with building awareness to symptoms, treatments, and evacuation strategies.
Day 7: Acclimatization day in Manang
Today is a great day to rest but it is also recommended to do one of the many side hikes. There are beautiful lakes to discover, monks to bless your passage through Thorong La, and caves to visit. Listed below are side hikes I would recommend:
- Milrepa’s Cave: Distance – 3.5 Miles Elevation Gain: 1,547ft. Great hike but if you’re expecting a cave to explore, you will be disappointed. However, the statue and story behind the statue of Milrepa are worth the visit. Milrepa was nicknamed “100 year monk” as he lived in the cave supposedly for 100 years in meditation. The statue is where the cave used to be (caved in around 5 years prior) and prayer flags and a gompa were erected in honor. The trail entrance between Bhraka and Manang.
- Ice Lake: Distance – 5.2 Miles Elevation Gain: 3512ft. Harder hike but worth the effort. Lake with stunning views of the Himalayas. The trail entrance is in Bhraka.
- Gangpurna Tal Lake: Distance – 6 Miles. Trail begins close to Manang and offers a viewpoint down to the lake and Manang.
- “100 Rupee Monk”: Distance – 1 Mile Elevation Gain: 803ft. Majority of people opt for the blessings of the monk. Pay him 100rps and he will bless you with a string around your neck for the upcoming pass.
3 day side trek to Tilicho Tal Lake
Day 8: Manang to Khangsar
- Distance: 3.4 Miles
- Elevation Change: 635ft
Today is a relatively easy day to Khangsar. There is only one steep uphill but it has beautiful views of Manang and the valley around it. The trail is dry and dusty thus be sure to wear a bandana. In Manang, the side trail can be tricky to find but the locals are helpful and will point you in the right direction. After that, the trail markers change from red/white to blue/white.
Once in Khangsar, there are a few options to choose from. Some are new, some are old but all have great views of the Himalayas. We stayed in one of the older options called Maya Hotel. This was the beginning of seeing the prices go up as hotels become scarcer. 500rps/night with less amenities than previous hotel stays. It is also recommended to call ahead to Tilicho Lake BC to reserve a hotel room or dorm bed. There are only two options and it is a popular destination. We stayed at Hotel New Tilicho Basecamp and were able to reserve ahead by calling 99466048 or 994660049. We used Skype when available otherwise had the owner of Maya Hotel call and book for us.
Day 9: Khangsar to Tilicho Lake B.C.
- Distance: 5.4 miles
- Elevation Change: 1,222ft
Today is a beautiful day and a hard hike day. Hopefully, with the stress taken out of your day by calling ahead and reserving your room at Tilicho Lake BC, you can enjoy a leisure pace. Hiking out of Khangsar begins with an uphill that leads through Shree Kharka to a suspension bridge river crossing to the bottom of a cliff edge. When passing through Shree Kharka, reserve a room for the following night. We stayed at Hotel Himalayan and found it reasonable and clean. Makes the next day’s journey a bit less stressful and rushed. The trail is cut into the cliff edge, switchbacking to the top. The edge gives incredible views of the Himalayas and the unique trail ahead. Be sure to take the lower trail as it is quicker with unique landscape features.
This trail is dangerous. It quickly becomes a scree field with steep hillsides above and below the trail. If it’s rainy or has snow/ice on the trail, I would second guess this section of the trail or consider microspikes. There is also danger of falling rocks so split your group up by distance and don’t walk next to each other or in a line.
The landscape changes to brittle red rock pillars, giant scree fields, and isolated boulders that look dangerously close to tumbling down the hillside. For all you Star Wars nerds, it looks like a scene from the planet Tatooine. The trail zig zags through the pillars and down some sketchy scree slopes. There is a spot to stop in the middle for a water and snack break. Although this is a bit dangerous, it is worth the effort and you’ll see people on mountain bikes riding it as well as donkey trains making their way through the pass easily. Once the scree field ends, Tilicho Lake BC is in view. If you don’t have a room, now’s the time to hustle for your bed.
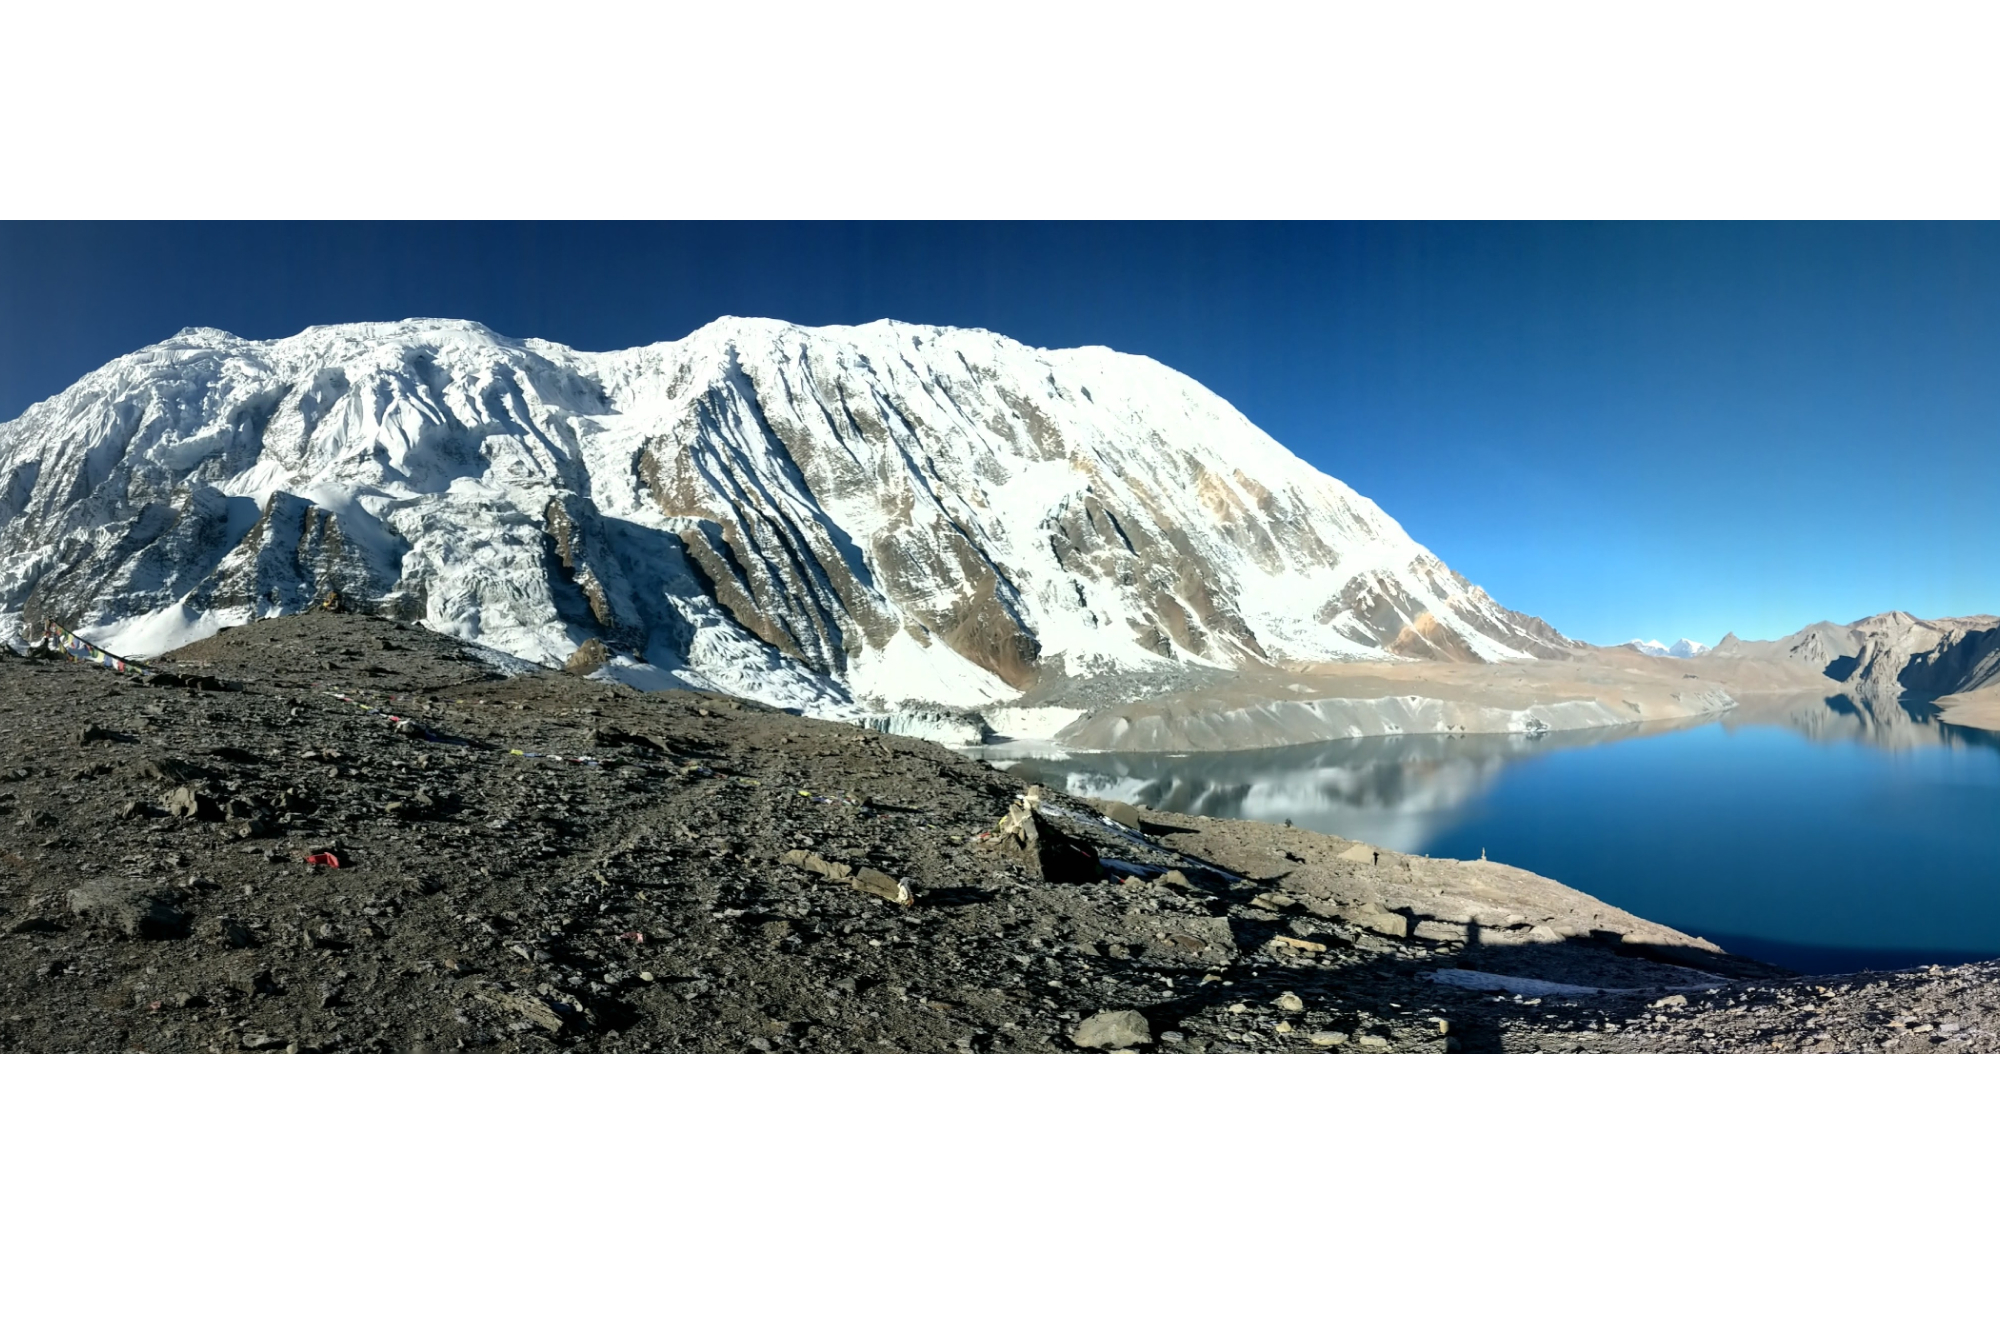
Day 10: Tilicho Lake BC to Tilicho Lake to Shree Kharka
- Distance: To Tilicho Tal – 3.3 miles. Tilicho Tal to Shree Kharka – 7.1 miles
- Elevation Change: Tilicho Tal – 2,804ft. Change to Shree Kharka – (-3,128ft)
Sunrise start day. Remember, this is also a primer for Thorong La by getting you acclimated. It’s a good idea to pack your trekking bag beforehand and check out of your room as the lodges may charge double if you are not checked out by 10am. You can leave your trekking back in the cafeteria and just bring a day pack. We started before sunrise and there was already 3 groups ahead of us. The hike is cold so bundle up. The trail stays on a gradual uphill until 2/3rds into the hike where it switchbacks up to a bluff that connects to the lake. You’ll struggle for oxygen so just remember your breath will be faster paced and you might feel slower and that is ok.
We started at 4:30am and arrived at the lake around 8am. There is a tea shop at the lake so it’s worth it to spend some time at the lake. There is a trail that continues past the lake that connects with Jompson however it is tent camping majority of the trail. The lake is the 3rd highest alpine lake in the world. You’ll see glacier walls running into the water, possibly some calving as the sun hits the walls, and maybe an avalanche off in the distance against the lake. A spectacular sight.
You hike back the way you came in. Passing through Tilicho Lake BC for your trekking pack and a light snack, you join back up with the trail you came in on the day before. Be sure to take the same way back you came in. Instead of going all the way back to Khangsar, stop in Shree Kharka where you reserved your room the day before.
Day 11: Shree Kharka to Yak Kharka
- Distance: 6.3 miles
- Elevation Change: -112ft
Today is a moderate day with one of the best views on the circuit. Leaving Shree Kharka towards Khangsar, the trail splits leading uphill to Yak Kharka and the other heading back down to Khangsar. Taking the trail to Yak Kharka, you pass through upper Khangsar which looks like ruins of a town however continues to have yaks grazing around it. You walk along the hill line that leads to an epic view of the valley with Manang below. The rock juts out from the hillside similar to Pride Rock in Lion King. A great spot for a break.
After the viewpoint, the trail descends on the other side of the hill. It bottoms out at suspension bridge and a restaurant on the other side. The restaurant was in the process of building a lodge when we were there so it may be a great stop if you still feel tired from the day before. The restaurant also has great yak cheese!
The trail climbs back up the other side of the river bed and rejoins the main trail. Back to red/white trail markers. From here, it’s a short hike to Yak Kharka. You’ll find several options for lodging here. We booked ahead but there were enough options that it wasn’t necessary. However, it is advised to book ahead for Thorong Phedi as there are limited options. We stayed at Thorong Base Camp Lodge and recommend it. Fresh bakery and clean rooms. Thorong Base Camp Lodge Ph: +977 981-8939860.
Day 12: Yak Kharka to Thorong Phedi
- Distance: 4.4 miles
- Elevation Change: 1,830ft
Today is an easy hike day as you don’t want to ascend more than 500 meters between sleeping stops until after Thorong La Pass. The trail is a straight shot to Thorong Phedi. If you booked your room ahead, take your time as your body needs a slower pace to acclimate.
You’ll notice the vegetation starts to become more scarce as well as less villages and locals. The trail comes to another suspension bridge that switchbacks up to a rustic teashop with spectacular views of the Himalayan peaks you just left behind. A great stop for a break
Once at camp, start charging up and fueling for the next day. Order breakfast for tomorrow as it will be another sunrise start.
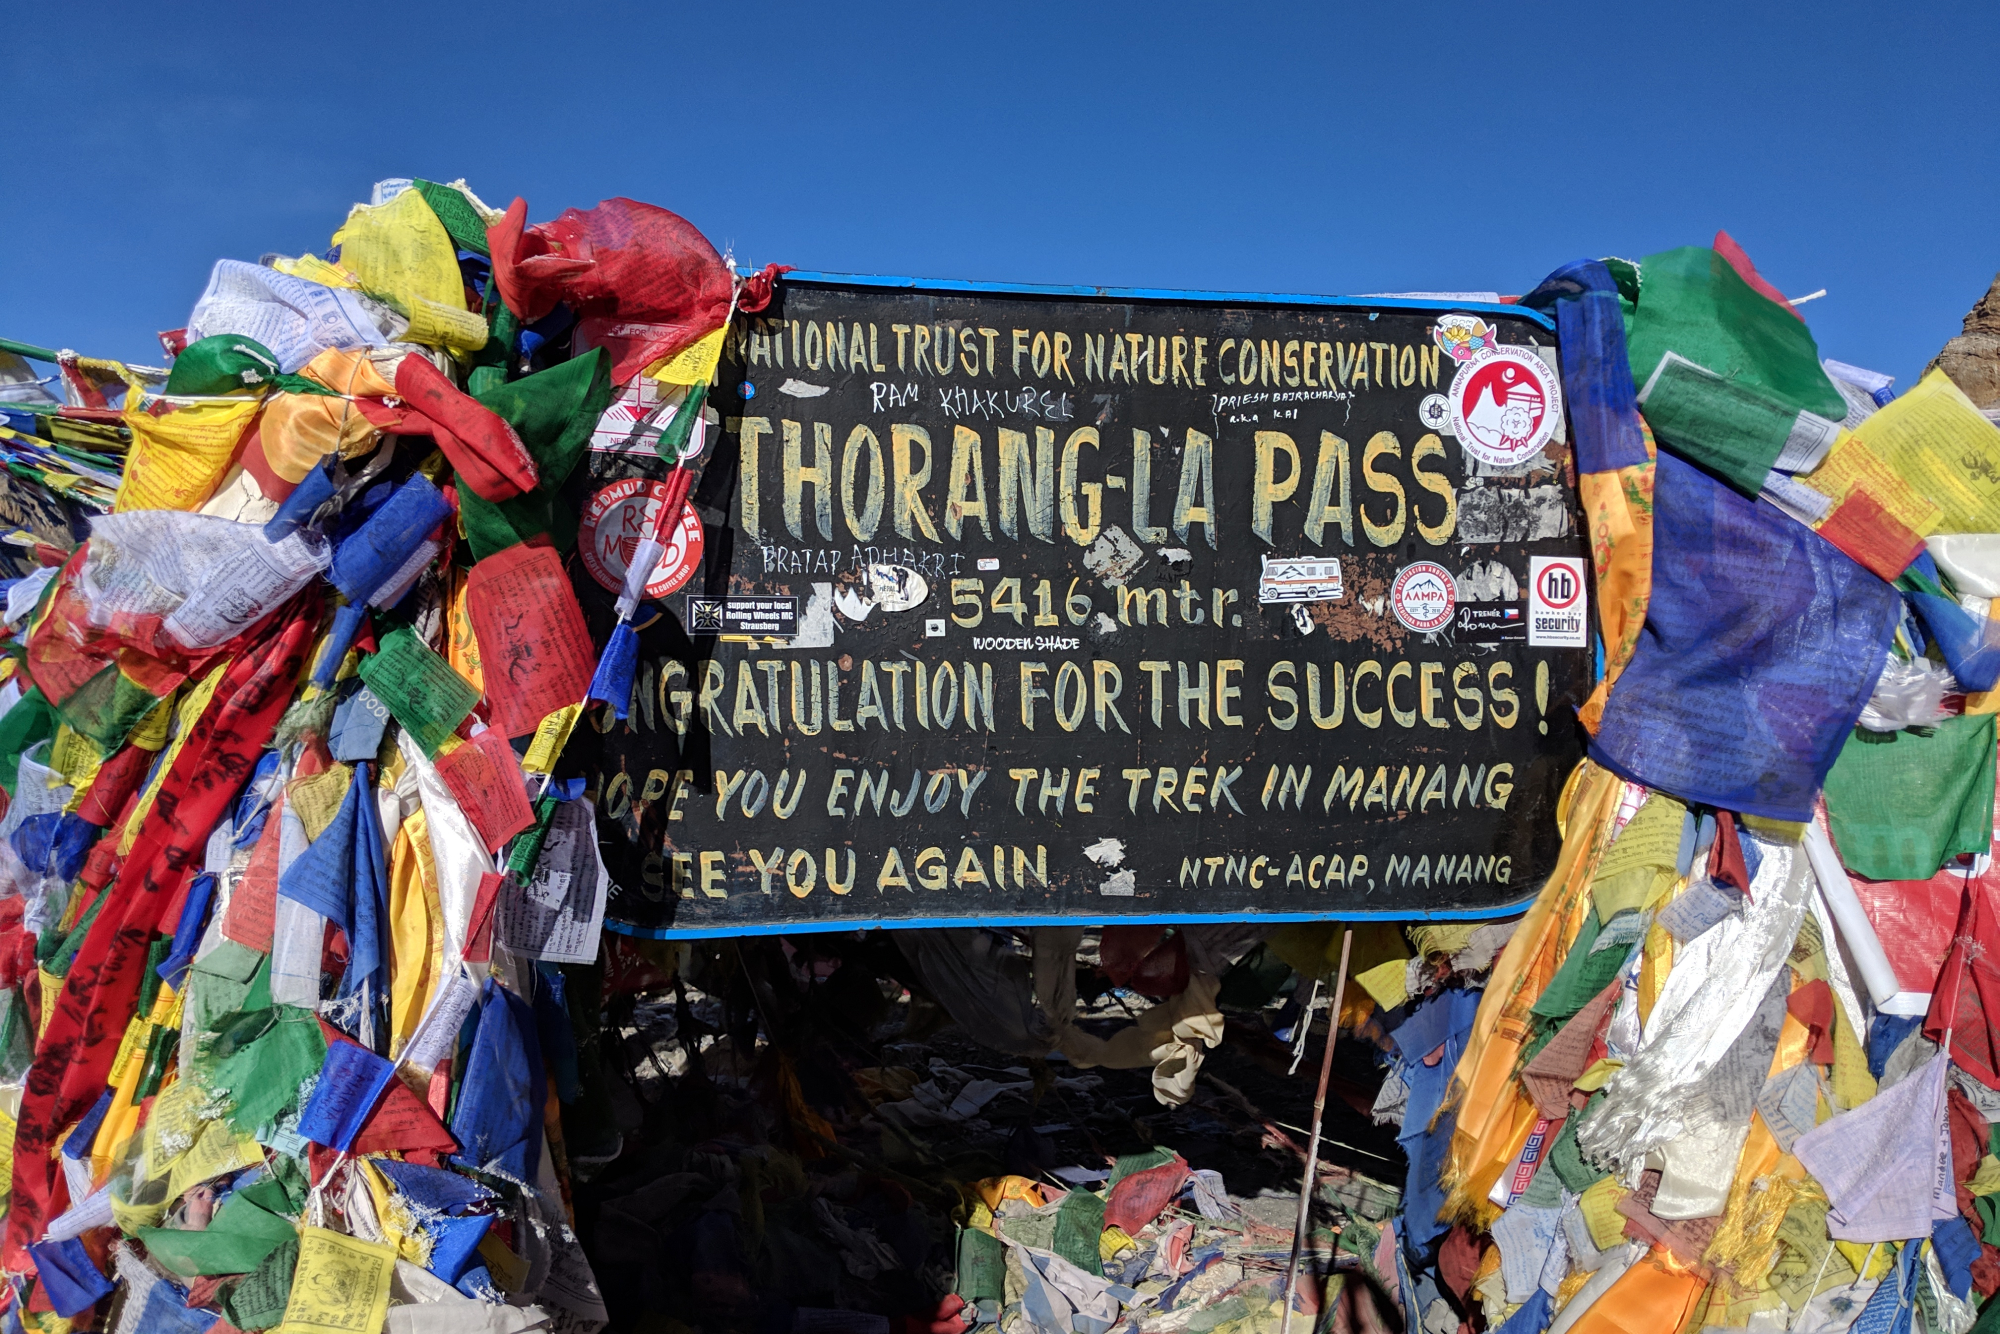
Day 13: Thorong Phedi to Thorong La Pass to Muktinath
- Distance: to Thorong La – 3.1 miles, from Thorong La to Muktinath – 5.1 miles
- Elevation Change: to Thorong La – 2,866ft. Thorong La to Muktinath – (-4,657ft)
Today is the push you’ve been preparing for. The air is thin, the distance is long, and the elevation change is drastic. With that said, you’re ready for it if you made it this far. Today is a sunrise start so have your breakfast and start your long day. Remember to take your time as your body needs a slower pace than you’re used to.
The trail switchbacks in the beginning but once past High Camp, the trail gradually inclines with several false summits. Be prepared for disappointment several times as you hike over a bluff thinking you’re at the top only to notice the trail keeps gaining elevation. You’ll also notice locals trying to sell you a mule ride or to carry your gear. If you need it, just know it will be expensive.
Once you reach the top, you’ll be surprised to notice there is a tea shop at the top serving expensive tea and hot chocolate. The Thorong La Pass sign is covered by prayer flags and, if you look closely, a gompa that’s hidden within the prayer flags. Pat yourself on the back, take your victory selfies, rest and drink water but don’t linger too long as it’s a steep and long descent to Muktinath.
The trail is significantly steeper on the other side of Thorong La. Expect the trails to be slippery if wet or has snow/ice. There is also a mountain bike trail near the trekking trail but the switchbacks are much longer. There are a few stops along the way however nothing that sells food or water until Charabu. There are also several side hikes around Charabu thus if you wish to adventure more, Charabu and Muktinath are both great options for home base as you adventure side trails.
Some people choose to continue on past Muktinath to Khagbeni however they are the outliers. You will be exhausted by the time you get to Muktinath. You also won’t expect Muktinath as it is a town with electricity, hot water, cafes, and a larger local population. A great place for a victory beer. There is also a checkpoint in Muktinath. We were advised to stay at the Hotel Bob Marley and highly recommend it. Best yak steak sizzler and espresso we’ve had on the trek. It is popular hotel due to the Lonely Planet guide book for the trek recommends it as well so either book ahead or be one of the first to arrive. Hotel Bob Marley: +977 985-7650097
Day 14: Muktinath to Kagbeni (alt route: Muktinath to Jomson)
- Distance (to Kagbeni): 8.1 miles
- Distance (to Jomson): 11.2 miles
- Elevation Change (to Kagbeni): -2,787ft
- Elevation Change (to Jomson): -3,053ft
Today you have two options; 2 days to Jomson through Kagbeni or take the alternate route over the adjacent hill through Lubra directly to Jomson. I recommend the trail to Kagbeni as the trail to Lubra and Jomson can be miserable and hard to find after Lubra. If your pressed for time, the alternative route may be your only option. The trail to Kagbeni is well marked and easy to follow. It is still a moderate hike.
The alternative trail is a bit tricky. Follow the road to the end of Muktinath where all the tourist jeeps park. There is a road/trail that continues past the parking lot and up to a bluff that overlooks Lubra, an almost dried river bed, and the other side of the Annapurna range. A great view and worth a stop. The trail breaks off into a few trails from the bluff. Follow the trail west and it will begin to descend towards Lubra. The trail is marked yellow instead of red/white. The trail is steep thus slipping is also possible. As the trail nears the river bed, it flattens out and crosses a suspension bridge with Lubra on the other side. Lubra is a cute old Tibetan town with a stream running through it. Less trekkers travel this direction thus there are limited options for food however they do exist.
After Lubra, you have two options; join the riverbed and walk directly to the main road or find the high trail and hike up then back down to the main road. We opted for the riverbed and regret it. Large river stones and high winds make it difficult to travel and easy to twist an ankle. It feels long walking on the riverbed as well. Once on the road, expect the high winds to continue past 11:30am as well as buses, jeeps, and local scooters driving past thus making the road dusty and miserable. You can see Jomson off in the distance but seems to take longer than you predict.
Once in Jomson, you continue to hike through old Jomson to the airstrip where all the hotels are located. You will pass a checkpoint. You will not be able to haggle for your room as well as you have been. Prices will be higher here. There are several options thus booking ahead was not necessary for us. This is also the place you can catch a bus to Pokhara. If you opt for a bus the following day, be sure to reserve your ticket ahead. There are booking agents lining the main street near the airport strip.
If you chose to take a bus back to Pokhara tomorrow, rest up as tomorrow will probably be the worst part of the whole trip. You can also catch a bus in Marpha thus you can continue your trek one more day and have some apple brandy in Marpha.
Day 15: Bus from Jomson to Pokhara
Today is a miserable day. Easily the worst bus ride I have ever been on in my life. Consider unpaved roads in a local bus with horrible suspension sneaking around dangerous cliff edges and no guard rail. The bus we were on only had one rest stop and it was a short stop. The bus was so bumpy that we had bruises from landing wrong in our seats. If you are car sick prone, this may be a tough ride.
The bus ride took close to 12 hours and we didn’t get to paved roads until later in the day. We met other trekkers who had a great idea of getting off the bus in Tadapani for the night and continuing the next day. Tadapani has hot springs and a cute town. If you opt for this optional route, be sure to check with your booking agent if there is a seat available the following day.
The bus drops you off centrally located in Pokhara. Hail a taxi and head lakeside. There are several options for accommodation. I couldn’t recommend Hotel Fly Inn more. A very clean, Japanese style hotel with a family hotel staff who give warm welcomes. The rooms overlook the lake and have AC. A luxury hotel after trekking. Hotel Fly Inn: +977 142-17474
Congradulate yourself as you’ve completed one of the best treks of your life.